
- Working Time: 4 hours
- Total Time: 4 hours
- Skill Level: Intermediate
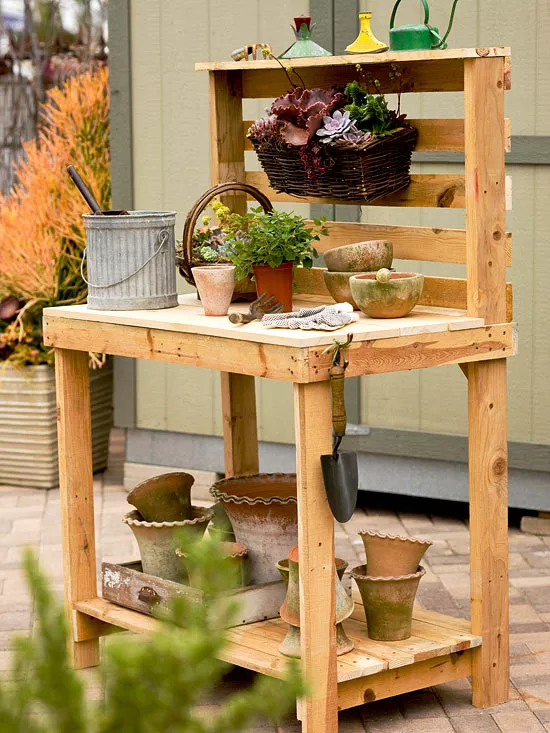
This DIY pallet garden bench is made from recycled wood—only the screws are new. The 37-inch high work surface is perfect for potting plants. Once you've assembled the bench, you can attach salvaged or inexpensive hardware along the countertop edge for holding gardening tools. Screw casters to the legs to make the bench more mobile. You can cut a hole in the surface and drop in a metal pan for holding potting soil or seed-starting mix. Add color by painting or staining the surface with lively colors.
What You'll Need
Equipment / Tools
- Framing hammer
- Pry bar
- Measuring tape
- Straightedge
- Pencil
- Miter saw or circular saw
- Table saw
- Screw gun
- Level
- Drill
Materials
- Wooden pallets
- 2x4 lumber
- 1-5/8-inch galvanized exterior screws
- Glue
- Sandpaper
- Stain and polyurethane or primer and paint
Instructions
-
Disassemble the Pallets
Disassemble the pallet(s) using a hammer and pry bar. Be careful not to damage the ends of the boards during deconstruction. Select the widest, best-looking boards for the pallet potting bench countertop. Measure the salvaged wood—its dimensions will determine how wide the finished bench can be.
-
Make the Boards Uniform
Using a straightedge, pencil, and miter or circular saw, mark and trim away splintered wood and square the edges of the boards. Cut off knotholes and other weak parts. This ultimately makes for a stronger potting bench.
-
Build the Legs
Use the pallet base or 2x4 lumber for the legs. Because most pallets have three 2x4 pieces, you need to break down a second pallet or join two pallet pieces with screws to make a fourth leg. To make a hutch top above the countertop on your pallet potting bench, use the table saw to notch 8 inches out of each of the two 2x4 pieces (for the back legs), and add another notched piece for the desired height of 60 inches. "Sister" these two notched pieces with screws and, if you wish, glue. These pieces can come from the other pallet's 2x4 base pieces or from 1x material cut to match the width of the leg pieces. After you've notched out all four back legs and extension pieces, connect them with screws.
-
Frame It Up
Starting with the two back legs, attach a 1x26-inch board; this will be the depth of the bench. Screw it in perpendicular to the inside of the leg pieces so the tops of the boards will be 36 inches from the ground. Screw in the other front leg to the 1x piece so you'll have a configuration resembling a lowercase h. Repeat so you have two identical pieces that will serve as the framework for the left and right sides of your bench.
-
Attach the Skirts
Add one countertop board at the back of the pallet potting bench to support it, then position the front face board, or skirt, and install it. "Sister" the front legs to match the thickness of the back legs. Flip the bench over and install the back skirt to complete the frame.
-
Add Blocks
Measure and install blocks on the back legs in the spaces directly in front of the back skirt. You will screw the final countertop piece into these blocks.
-
Install the Countertop
Choose your countertop pieces, lay them flush with each other from front to back, and screw them into place. The front countertop piece can overlap the front skirt slightly if you wish. You will have to cut the last piece to the appropriate width and length.
-
Build the Bottom Shelf Support
To create supports for the bottom shelf of the pallet potting bench, attach two 1x pieces to the front and back legs on each side, about 7 inches above the base. You can install temporary spacers (the longer pieces parallel to and touching the ground) to ensure consistent shelf height. Then, measure the distance between the tops of the spacers and the tops of the shelf-support pieces.
-
Install the Bottom and Top Shelves
Screw in the bottom shelf pieces. Use 1x material the same way you did the countertop. Add the top shelf, screwing it into the tops of the back legs.
-
Add the Back Slats
Install more 1x boards to form the back slats. Make sure to generously and evenly space the boards so you can hook things over them in the future. Use a level to make sure the slats are straight.
-
Cut Bracing Blocks
Using 1x material, measure for length and cut two blocks with 45-degree ends. Drill holes into the edges so the blocks won't split when you screw them into place. Start screws into the blocks.
-
Install Bracing Blocks
Position the bracing blocks on the insides of the back legs. Drive screws into the back legs, the countertop, and the back skirt. Drill in the back-skirt screws from the outside. These blocks will prevent side-to-side motion of the pallet potting bench.
-
Smooth and Stain or Paint the Surface
Remove all rough, splinter-inducing spots with sandpaper. Wipe down or vacuum the entire bench to remove wood dust. Stain or paint the bench. We recommend one coat of stain, then two coats of polyurethane, following the label instructions for drying times. If you paint, apply two coats of primer and two coats of paint for a long-lasting finish.